Showing posts with label Magnolia. Show all posts

Monday, March 10, 2014

Second Magnolia Drawn and Polished

Finally finished my last magnolia drawing.

I thought I had finished it last week, but the more I looked at it, the more I was dissatisfied with it.

It was not bad, just not finished the way I thought it should.

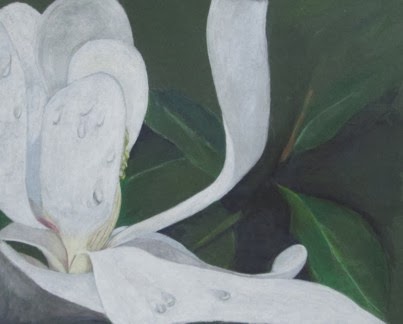
Still did not have that bright contrast between the white blossom and the dark green leaves.

Even the "final" polish did not give it the strong look I wanted, so I sat and stared at it.


Evaluating your own work is one of the hardest things you will ever do.

Looking critically at it, I saw the shadows just were not strong enough. Now, this is a white flower, and my left brain kept telling me, "its white, what do you want?" But it was not 100%.

I did work on intensifying the white, but it just did not come together. So I decided to attack the shadow.

Using 70% cool gray on the bright sunny white was one of the hardest things I ever did. But it was necessary. Without the darker shadows, the white just did not look white enough.

So something to remember, White is never white! It is the most reflective color and will always pick up its surrounding color and will totally change with contour and shadows.

Now, with an additional 5 layers of blended color, the work more closely resembles what I saw in my head.

Monday, February 24, 2014

Colored Pencil, Blending, Burnishing and Polishing

Finishing up a colored pencil painting is more than simply putting down the pencils.

Tools needed to finish,
Sandpaper pad,
 erasing shield,
 Chamois,
 burnishing pencil,
 stump,
 blending pencil,
 pencil eraser,
 paper towels,

Using a paper blender

smoothing the color out

polished picture

Detail of flower

Monday, February 17, 2014

Magnolia Drawing, Working the Background

Finished background
While the background is not the focus of the drawing, it still requires strong attention.

We want the background to compliment and support the focus, not leave it hanging.

There are many ways to approach this.

You and simply have a mottled background, like the fuzzy blobs of color you get in a photograph, or you can put in enough details to suggest focus. What you do is up to you, but consider the response you want.

Many times I have heard artists and students say "its that way in the photo".

So?

Are you the photographer?

Are you simply copying the photo or creating a work of art?

Because of the shallow depth of field in the photograph (we will not go into that here,) most likely there is no detail available for the background.


If you have taken the photos yourself, you might start taking more than one photo, one focused on the object, one on the foreground and one on the background. If you have not done this, it is still up to you to supply the background.

Hint: it does not have to match the photo!

With the second magnolia I decided to take a different approach to the background.

watering the background
With the first, I simply put in some shading to suggest leaves. Highlighted a few and left the rest to the viewer to supply. In fact, this happens. A couple  of good leaves and a few dark shadows and people "see" the background leaves.

This time I wanted to suggest the leaves, but also to trigger a more painterly feel to the colored pencil painting. To this end, I used watercolor pencils, simply putting in blocks of color and using water and a brush to create the background.

As you can see, there really isn't much to the background. A few leaves, a suggestion of shape and highlights. Contrast does the rest.


Monday, February 3, 2014

Magnolia in Colored Pencil-On to the First Layer


Layer l
With the back ground blocked in , and the underpainting of the magnolia blossom dry, I will start on developing the whites. 

Filling in the back petals and the first layer of gray
White is the most reflective color and is never found in nature as pure white. It always, always, always reflects some of the colors surrounding it. These large blossoms are no exceptions. But for the first layer, a base of pure white Prisma Color is placed on the focus or most forward and prominent petals. 


These petals in life are large, glossy and slightly a creamy yellow. But only slightly. The brilliance of the white flowers is what makes these trees so beautiful. That and the fact that these flowers are the size of dinner plates! 

Finding the flow of the drawing
So a layer of white, even on the parts that will be shaded later gives a good base. 
 
At this point, you might be tempted to rush things, use long strokes to cover as much area as you can. Fight this!  Color pencil is not a fast medium. Yes it is try, but it takes time and skill to have it come out. Long linear strokes at this point will only cause trouble latter. They will create ridges you will have to fight to reduce and eliminate.
 
Use small circular or oval strokes to cover the area carefully. You want a smooth surface that will accept subsequent layers. Use light pressure. It is better to put two layers down instead of one thick layer that dents the surface and crushes the tooth of the support. 

The back or in this painting, supporting petals will be covered in 10% cool gray, also by Prisma Color.  With any white work, you really need a full range of grays, both warm and cool.

 
As the petals develop and open from the bud, the base is creamy yellow, even on the fully developed flowers. And as they age, and begin to fail, this yellow becomes more evident. I am using Cream, and French Gray, warm, 50%.
Close up of the developing flower,


Monday, January 20, 2014

Magnolia-Blended, Burnished and Polished

Worked on the white magnolia colored pencils drawing.

Last week I used a solvent, mineral spirits to help blend the layers of pencil into a more smooth value transition. Using a stump rather than a brush, I blended the lighter whites into the darker shadows.

When dry I used both a pencil blender then burnisher.

Finally, I used both a paper towel and soft cloth to polish the drawing until it glowed and looked almost like an oil painting.

This is an un-enhanced photo taken in natural light of the completed drawing/painting.

Monday, December 30, 2013

Drawing progress - Magnolia

Colored pencil drawings takes time.


Lots of time.

Progress from previous shot after 3-4 hours.


I have kept working


and working,


slow but I am making progress.


I did not have as much time as usual to work on Wednesday. Although I came into the gallery early, there were visitors and business to take care of.

This week has been much busier than expected. The weekend storms snapped off our remaining tree in the back yard.

So as of the start of today, the flower itself was taking shape, but it just laid there on the surface.


As of the end of today, I think it is coming together finally.

I think the back ground leaves look a bit too small, so will work to enlarge them tomorrow.

But it is starting to look like those large, glossy flowers!.

Monday, December 16, 2013

More Magnolias

Spending some time working on my Magnolia project.

The small drawing, 5x7 on pastel board is becoming saturated. It will take a little burnishing to get the details to work on it.

Work is coming along, but photographing that work is giving me trouble. It is overcast and cloudy, so getting a good shot is difficult, even in the sunroom! I have tried it with a flash, but you know how it drains artwork.


I really try to use as close to natural light as I can so people seeing the artwork can get a feel for what the piece really looks like. But on a cloudy day that is not really going to happen. If the piece was finished, I would wait, but I am going to keep working on it, and wanted to get it at this stage of work. Hopefully you get the feel for what is happening with both drawings.


Drawing as of 12-8-13
The large piece, 16 x 20 is taking a lot of pencil! Good thing I ordered a half dozen white pencils from Dick Blicks! I really did not want to use watercolor as an underpainting on this one, but wanted the green of the mat board to remain pure. Isn't happening! but I keep cleaning up the background.


Getting all the shades of grey and yellow on this one is going to be a real challenge. Drawing white flowers is much more complicated than the casual observer would imagine.


Detail
I am also finding the detail of what will be the seed cone a challenge. It is so pale and there is so much detail. Most people look at the large petals and overlook the nectar rich cone of the flower. As the individual areas mature and "bloom" the cone seems to unpeel. Each of those green things is a nectar tube which will get fertilized and produce a bright red seed in the fall.


Monday, December 2, 2013

Magnolia in colored pencil progress

I made a little progress on the small 5 x 7 colored pencil drawing of a magnolia today.


The Pastelbord has good tooth and can take a lot of layers of colored pencil. I have gone through almost a complete white pencil!

So now I can start fine tuning it and hopefully it will turn into something.

Also got some large boards to do a "grown up" version.


..............................and lots of white pencils!

Thursday, November 28, 2013

Magnolia Drawing in Colored Pencil

Started a new drawing. Hopefully it will be the first in a series of colored pencil drawings and paintings of magnolia blossoms.

I have long been meaning to try drawing these large, dinner plate sized flowers. Years ago I good a series of reference pictures of the magnolia blossoms on a neighbors trees, but never did anything with them.

Now, 3 computers latter I needed to locate these pictures. I thought it would be along search, but to my surprise they were on the first CD I looked at.

I take a lot of pictures, and back them up onto CD's by date. I do write on the CDs what they generally hold. I do know when these trees bloom so thought I would have to look through all of June 2005. But not so.

Printed out several shots of these flowers on regular printer paper. I don't need them in glossy format, the photos are for reference only.

First up is a small 5x7 drawing done on Ampersand Pastelbord, the dark green. I drew the basic flower on with white pencil, then filled in with white inktense pencil. I can use water to float the pigment of inktense to get good coverage. Then when it dried, I can fill in with white pencil.